In the iLaunch Content Management System, we try to make newsletter campaigns as powerful and painless as possible. iLaunch allows you to build your contact database in a number of ways and then provide you a comprehensive campaign builder for selecting, filtering and preparing your content and target audience.
Building Your Contact Database
Before you send out your campaign, you need some people to send it to. This is where the contacts section comes into play.
Your contact database can be populated in a number of ways:
- People who subscribe through your website
- Add contacts manually in the admin panel
- Import a list of subscribers from a CSV file
You can also export your contacts out of the system for example to import into excel.
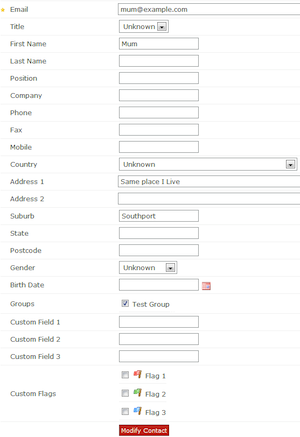 |
Contacts can have a number of fields associated with them. At the very least every contact needs an email address, but you can also provide additional information such as where they are located, and other demographic details such as gender and age. The purpose of this information is that you can use it to filter your contact list prior to sending a campaign, and also for viewing how your campaign performed across a demographic. |
Your first campaign
OK, so you’ve built up this impressive list of contacts, and now it’s time to email them an update about your wonderful resort. Proceed to the iLaunch Admin panel to get started:
Click on Newsletters > Add Campaign in the side menu. You will be prompted to enter some information about your campaign:
Adding a campaign
1. Campaign Name – This is your internal name for the campaign. Enter a few words which describes the campaign (eg. Spring special 2012).
2. Subject – This is what the client will see when your campaign arrives in their inbox. Keep it relevant, appealing, and avoid too much punctuation. For more tips on subjects, view this article
3. Template – The template defines the look and feel of your campaign. All iLaunch websites come with a standard template, but if you ask us to, we can build you a special template (eg. Easter theme, Romantic theme). If in doubt, just choose the Standard Template.
4. Content – This is where you let it rain. Good content is brief, and enticing. If your campaign has any point at all then it is probably to get the recipient to perform some kind of action (such as make a booking). So keep this in mind as you prepare your content.
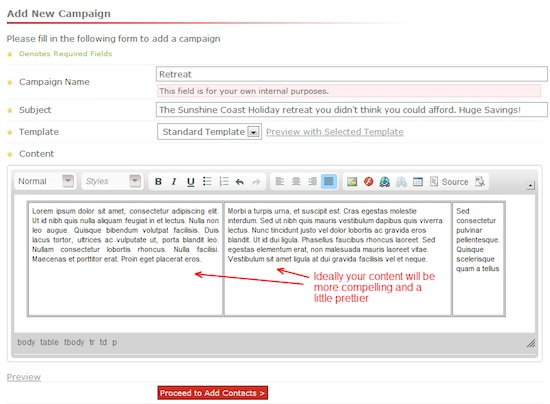
Click on Add to Contacts to proceed to the next section (your campaign wont be sent until the last step).
Add Contacts to Your Campaign
OK our campaign is created and we just need to decide who gets it. The Contacts section of your campaign prompts you to add one or more of your existing contacts to the domain.

You may have an enormous database of contacts… or depending on how things are going – just your mum, dad and a close cousin. Regardless, selecting and finding contacts if very easy.
There are a range of filters that you can use to find the contacts you want to add. Use the filters to sort contacts based on groups, email address, by name, or by demographic and click the Filter Results button to return only those contacts.
Then you can simply click the Add All Results button, or you can tick only the individual results you would like to add and click Add Selected Results button.
You can repeat this multiple times. For example, you might want to add your 30-40 year olds but you may also want to add contacts in a special group you’ve created called “Business Professionals”. In this instance, first filter your list by entering 30 and 40 in the Age Range filter, and click Filter Results. Then you can simply click Add all Results. Next, you can change the Group filter to “Business Professionals” and repeat.
Don’t worry, it’s smart enough that the same contact won’t be added twice even if you have business professionals in the 30-40 age range.
As you add contacts they will appear in the Selected Contacts tab:

Once you’ve added all the selected contacts you would like to, we need to send a test email to make sure our campaign looks ok.
Testing, testing, testing
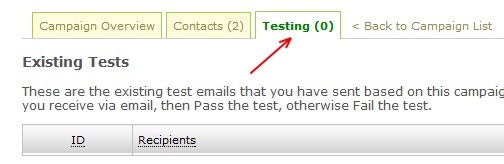
You can’t send out your campaign to your contact list until you have tested it, because once you’ve sent it there is no undo button.
To send a test click on the Testing tab at the top of the campaign:
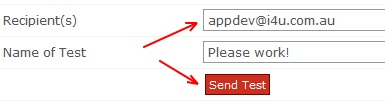
In this area you will be prompted to enter one or more comma separated email addresses which will receive the test email. Put in your email here, an optional name for the test, and click Send Test
Check your emails in a few minutes and the test should have arrived. Check over everything and if it’s fine you can move on to the next step. Otherwise go back to the Campaign Overview and fix up your content.
Send it out!
Now that you’ve created your campaign, added contacts, and performed a test send, you’ll notice that a new tab appears called “Send or Schedule”.
In this area, you can send the campaign immediately, or enter a later date and time for your campaign to be sent.
If you’re the impatient type, click Send Campaign Now.

The snappy snapshot
So you’re campaign is “out there” (somewhere) amongst your contacts but whose reading it? The snapshot tab of the campaigns area shows an overview of all the contact activity on your campaign. You can see how many of your subscribers have read it at the current time as well as bounces, unique views, and click throughs.
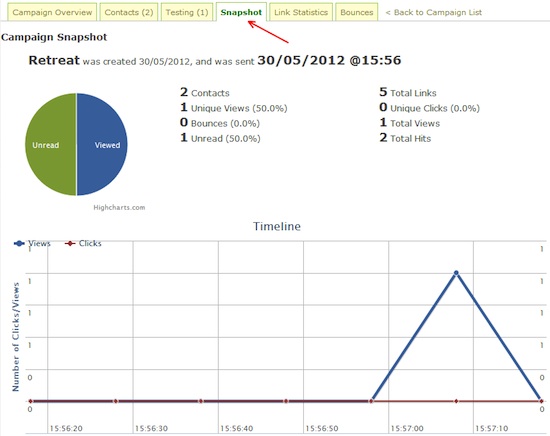
The timeline shows you over the current length of your campaign when activity occurred. Two additional tabs called Link Statistics provide a more detailed list of the links and bounces generated by your campaign.
You can also look back through the contact tab which will be updated periodically to show fine-grained detail of which users viewed your campaign and some details about the activity such as their email client and basic location details.

Other Related Posts
- Why List Segmentation Is Crucial To Your Resorts Email Marketing Campaign
- Learn How To Track your Email Marketing Campaigns in Google Analytics
- Six Steps For Successful Email Subject Lines
- Learn How to Personalise your Email Marketing Campaign